So you’re staring at that old wooden deck or kitchen table, wondering how to give it new life without messing up the color. You’ve heard about stains—oil-based, water-based—but which one actually works for your project? And how do you pick a color that won’t clash with your couch or turn into a sticky mess? Whether you’re a DIY newbie or just want to avoid another weekend disaster, this guide’s got you covered. We’ll break down oil vs. water stains like you’re chatting with a neighbor over coffee, share pro tips for nailing your color scheme, and even toss in some creative ideas to make your space pop. By the end, you’ll know exactly how to choose, apply, and love your stain—no stress, no guesswork.
Oil vs. Water Stains: What’s the Big Deal?
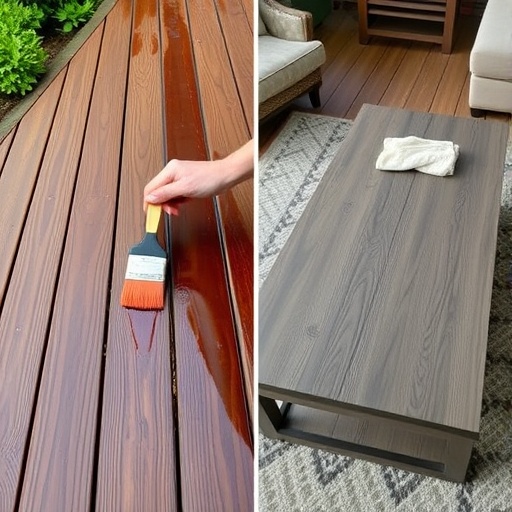
Let’s start simple. Oil-based stains are like that thick, cozy blanket—they soak deep into wood, last forever, and handle weather like a champ. Perfect for decks or outdoor furniture that battles rain, snow, or that surprise summer downpour. But they’re also messy, take forever to dry, and smell like a hardware store exploded. Water-based stains? Think of them as the quick, easy friend. They dry fast, clean up with soap, and come in tons of colors. Great for indoor projects (like bookshelves or tables) where you don’t want fumes lingering for days. But they might need a fresh coat sooner, especially in sunny spots.
Imagine Sarah, a mom in the suburbs, redoing her backyard deck. She picks oil-based stain because her kids spill lemonade daily, and she doesn’t want to redo it next summer. But her friend Michael, who’s re-staining his kitchen table, goes water-based—no one wants burger night smelling like paint thinner.
Picking Colors That Don’t Clash (and Actually Look Good)
Stain colors aren’t just “light” or “dark.” They can change based on the wood and stain type. Oil stains often look richer and deeper—like mahogany or walnut—but can yellow over time. Water-based stains stay truer to their color, which is awesome if you’re matching a specific gray or whitewash. Here’s the trick: test a small spot first. That “warm cedar” might look orange on pine, but dreamy on oak.
Pro tip from the team at HomeCrt: If your room has lots of warm tones (think red couches, yellow walls), cool-toned stains like driftwood gray can balance it out. Love farmhouse style? Try a water-based white stain on pine shelves—it’ll look crisp without hiding the wood grain.
How to Apply Stains Without Ruining Your Weekend
Oil stains need patience. You’ll have to sand the wood smooth, apply the stain with a brush (wear gloves—this stuff sticks), and wait a full day before adding a second coat. Water stains are more forgiving. If you’re staining a dresser, you can sand lightly, wipe on the stain with a rag, and add another coat in just two hours. Bonus: no toxic fumes means you won’t have to evacuate your pets.
- Outdoor project? Oil-based is your buddy. Try a cedar tone for a classic look that hides dirt.
- Indoor DIY? Go water-based. A honey oak stain can make cheap pine look expensive.
Oh, and never skip the primer if you’re mixing stain types. Painting oil over water (or vice versa) without prepping can lead to peeling—trust us, we’ve seen the DIY fails.
Creative Ideas to Make Your Project Shine
Stains aren’t just for floors! Try these fun twists:
- Use a water-based stain to paint geometric patterns on a plain coffee table. Tape off sections, stain, let dry, repeat. Looks custom, costs $20.
- Mix stains. Oil-based on table legs for durability, water-based on the top for a precise color. Just seal it with a clear coat afterward.
One HomeCrt customer stained her porch railing with a mix of espresso oil stain and a touch of black water stain. Result? A unique charcoal-brown that matched her front door perfectly. Total project time: a weekend, zero regrets.
Wrapping It Up: Your Stain Cheat Sheet
So here’s the deal: oil stains last longer but require more work. Water stains are easier and faster but might need touch-ups. Colors behave differently with each type, so always test first. Whether you’re refreshing a fence or building a crib, pick the stain that fits your timeline, skill level, and style. And hey, if you’re stuck, HomeCrt’s blog has a free stain color planner—grab it, play around, and avoid the “oops” moments.
At the end of the day, staining’s like cooking—follow the basics, but don’t be afraid to tweak the recipe. Your house, your rules. Now go make that woodwork look awesome.
Need more ideas? Check out Bob Vila’s guide for pro techniques or Sherwin-Williams’ color tool to visualize stains. And if you’re local, swing by HomeCrt’s shop—we’ll help you pick the perfect can.